
Column chromatography is a commonly used purification technique in labs across the world. Done right it can simply and quickly isolate desired compounds from a mixture. But like many aspects of practical chemistry, the quick and efficient setting up and running of a column is something that can take years to master. Here we provide some tips and tricks for running a column, troubleshooting for some problems commonly encountered during column chromatography, and some “quick and dirty” alternatives to a full column.
Running a Column
We have previously looked at how to pack a column and how to choose the necessary equipment and solvents. Once you have set this up, you will be ready to load and run your column. Loading the column involves placing the sample directly onto the top of the column and allowing it to absorb onto the silica.
To load the column:
- Dissolve the sample in the minimum amount of solvent (5–10 drops). A slightly more polar solvent than the one you will be using for the column can be used if this helps with dissolution of the sample. If you need to use a solvent like dichloromethane or something stronger, the dry-loading method described below may be preferable.
- Using a pipette or syringe with a thick needle, drip the sample directly onto the top of the silica. Try not to disturb the surface. Ideally, the sample should be equally distributed across the surface so that it forms a thin horizontal band.
- Once the entire sample has been added, allow the column to drain so that the solvent level touches the top of the silica.
- Carefully add a layer of sand (approx. 2–5 mm). This will help prevent the surface of the silica from being disturbed as more solvent is added.
- Use a pipette to carefully add more solvent so that the solvent level is about 10 mm above the top of the sand.
- Allow this solvent to drain until the solvent level is approximately 1–2 mm above the top of the sand.
- Repeat steps 5 and 6 once or twice more. This will ensure that your sample is absorbed onto the silica.
- Finally, add as much solvent as required. You are now ready to start running your column.
If your compound has poor solubility in the solvent system that gives the best separation, it is possible to dry-load the sample onto the column.
To dry-load your compound, you will need:
Round-bottomed flask
Dry silica
A solvent in which the sample dissolves completely
Rotary evaporator
Method:
- Dissolve the sample in an appropriate solvent. Transfer it to a round-bottomed flask if it is not already in one.
- Add dry silica to the dissolved sample (approx. 10–20 times the mass of the sample).
- Swirl or stir gently to ensure all of the silica is suspended within the solution.
- Gently evaporate the solvent by using a rotary evaporator until the silica is dry and free-flowing. If it is still an oil, add more silica and repeat the procedure.
- Carefully add solvent to your column so that the solvent level is about 2–3 cm above the top of the silica. Use a pipette to ensure the surface of the silica is not disturbed.
- Pour the dry silica that is saturated with your sample into the column and allow it to settle. Make sure that the solvent level always remains above the top of the silica and no bubbles are present. The best way to do this is to add the saturated silica slowly.
- Follow steps 4–8 of the wet-loading method described above to fully absorb the sample onto the column.
Collecting Fractions
To begin collecting fractions, place a suitable container under the column and open the stopcock or tap. For every column there is an optimal flow rate. Adjust the stopcock to control the flow. If the flow rate is too slow, diffusion processes will lead to band widening (Fig. 1, a). If it is too fast, there is not enough time for equilibration and the compound will be forced down the column, leaving a long tail behind (Fig. 1, c). For small-diameter columns, the optimal rate is lower than that for larger-diameter columns. Therefore, larger columns can be run with a higher flow rate than smaller columns.
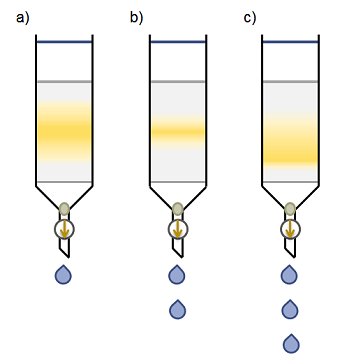
Figure 1. Changing the flow rate can alter the quality of the separation. Optimal flow rate is shown in b).
At no point should the solvent level be allowed to drop below the top of the silica (“to run dry”). Solvent should be replenished regularly and well before there is a danger that this may happen. Top up the solvent when more than 2 cm of solvent still remains above the protective sand layer. Adding solvent early, that is, when there is still solvent in the column, will also help to minimize disturbance to the silica surface and the resultant disruption of any bands still present near the top of the column.
There will be a dead volume in which no sample will be present. The size of the dead volume depends on the size of the column and the compounds being separated. You may be able to see a line corresponding to the polar solvent used to dissolve the sample. This can be a good guide for when you should start collecting fractions. If you can’t see a line from the polar solvent, mark the starting solvent level by drawing on the outside of the column with a non-permanent pen. Make a second mark on the column beneath the first corresponding to two thirds of the silica length (Fig. 2). Once the solvent level drops below the second mark, it is a good time to start collecting fractions. If you are in any doubt as to your compound’s position on the column, start collecting fractions earlier rather than later.

Figure 2. Dead volume estimation.
Fraction Size
For large columns, there is no point in collecting lots of small fractions: They will end up being recombined. However, collecting only a few large fractions can mean you end up with two bands in the same fraction, especially if the bands come off the column close together or there is tailing of the lead band.
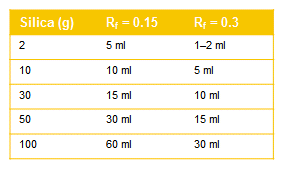
As a rough guide to the ideal fraction size, see Tab 1.
Table 1. Approximate fraction sizes for different size columns.
How do I tell which of my collected fractions contains my product?
Spot some of each fraction on a TLC plate and develop it as you would a test TLC. Make the TLC plates larger than usual (approx. 5 x 7 cm) so that you can check 5‒10 fractions per plate.
See How To Run a Test TLC for more details.
Flash Column Chromatography
If you are running a flash column, there is one more important parameter to control: pressure.
Gas pressure is typically set at 1–2 psi. This can be higher (2–4 psi) if you are using very fine silica. Viscous solvents, such as butanol or water, may also require the pressure to be higher than 2 psi.
The absolute limit for glass columns is 7 psi!
A glass gas inlet can be secured by hand or with a plastic quick-fit clip because these will pop off if the pressure gets too high. Other clips or methods of securing the gas inlet are not advised. Glass gas inlets can also break if the release of the pressure build-up causes them to fall or otherwise hit a hard surface. For added safety, the gas can be delivered through a syringe needle pierced through an unsecured rubber septum. The septum will pop out if the pressure gets too high, but will not break on impact.
Troubleshooting
We have previously looked at how to pack a column and how to choose the necessary equipment and solvents. But no matter how carefully you pack your column, choose your solvents, or run your column, things can still go wrong. The first thing is not to panic; things are often not as bad as they seem at first. Next, remember that you are not alone. While every problem is unique, many people will have experienced similar problems and will have found solutions. Here we present some of the most common problems and their most likely solutions (Tab. 2).
Table 2. Common problems encountered during column chromatography and their solutions.
.gif)
2D TLC
Two dimensional TLCs are useful for determining whether your compound is stable on silica or for samples that contain a large number of components.
To run a 2D TLC you will need:
TLC sheet
Scissors/Stanley knife/box cutter
Pencil
Glass container, such as a small beaker with a watch glass or a petri dish as a lid
Solvent(s) to be tested
Capillary TLC spotter or micropipette (see: How to Make a Capillary TLC Spotter)
Tweezers
UV lamp or potassium permanganate dip to visualize the TLC
Method:
- Cut the TLC sheet into a square. A good size is 7 cm x 7 cm, but make sure that this will fit in your solvent container first.
- Pour the solvent(s) you will use for the column into the glass container. The solvent should be 2–3 mm deep so that the spotted sample is not submerged. This ensures that the sample does not dissolve into the solvent and travel up the TLC plate with the solvent.
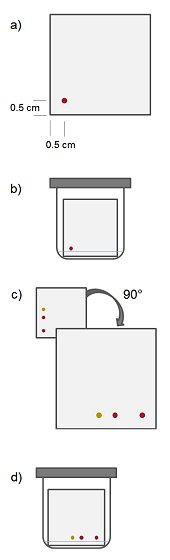
- Use a capillary spotter or micropipette to “spot” some of your sample onto the plate in the bottom left-hand corner (Fig. 3, a). The spot should be approximately 0.5–1 cm from the bottom and left-hand edges and 1–2 mm in diameter.
- Stand the TLC strip in the container with the solvent(s).
- Wait and check the TLC regularly. Do not move or disturb the plate or the TLC container as this will cause ripples in the solvent and irregular progress of the solvent front up the plate.
- When the solvent front is 0.5–1 cm from the top of the plate, carefully remove the plate from the container with tweezers.
- Allow the solvent to evaporate.
- Rotate the plate 90° so that the original sample spot is in the bottom right-hand corner. The component spots (if visible with the naked eye) will form a horizontal line along the bottom of the plate (Fig. 3, c).
- Place the TLC plate back into the container with the solvent(s).
- Wait and check the TLC regularly. Do not move or disturb the plate or the TLC container.
- When the solvent front is 0.5–1 cm from the top of the plate, carefully remove the plate from the container with tweezers.
- Allow the solvent on the plate to evaporate, and then visualize the plate by using either a UV lamp or potassium permanganate dip.
- Mark the position of all spots in pencil. Draw a diagonal line from the corner where the sample was spotted, through the sample spot, to the opposite corner. Compounds that are stable on silica will appear on the diagonal. If a compound decomposes on silica, its spot will be below the diagonal line (Fig. 3).

Figure 3. The set-up and procedure for running a 2D TLC to discover whether a compound is stable on silica.
If you discover that your compound is not stable on silica, consider using alumina, or an alternative purification technique, such as crystallization or distillation. It may also be possible to postpone purifying your compound and take the whole sample on to the next step in your sequence. Depending on the next reaction, your compound may be converted into something that is more stable towards silica and easier to purify.
Alternatives to full columns:
Columns can be time consuming and are not always necessary. If your sample is a solid, recrystallization may be a quicker and simpler method of removing impurities. If your sample only contains minor impurities, a silica plug may be a faster alternative. For small samples (~50 mg and under), a micro-column can be run in a fraction of the time a full column requires. These “quick and dirty” techniques do not give as good separation as a full column because the sample spends less time in contact with the silica. However, under the conditions described above, they can save a lot of time and resources.
Silica Plug
A silica plug is a crude alternative to a full column. It is only suitable for samples with a high Rf value and few impurities that stick close to the baseline (Fig. 4).

Figure 4. Example TLC plate that shows a sample which may be suitable for purification with a silica plug.
The set-up for a silica plug is similar to a column with a frit except it is performed in a fritted funnel with a side arm for connection to a vacuum line or water pump (Fig. 5). A thin layer of sand is placed in the bottom of the fritted funnel to prevent the silica from passing through the frit. Silica is placed on top of the sand by using the slurry method (see Column Packing). The sample is then loaded onto the silica in the same way as with a column.
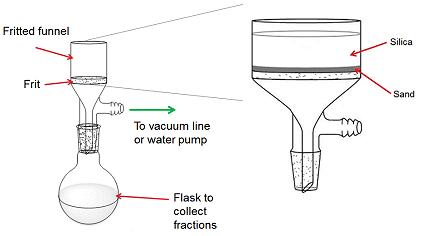
Figure 5. The set-up for running a silica plug.
The size of the funnel and the amount of solvent collected as fractions will depend upon the amount of the sample to be purified. Fractions are collected in much larger volumes than with a column. Typical fraction sizes are 100–200 mL. You should aim to half fill the round-bottomed flasks. If the flasks become more than half full, you risk losing some of your sample into the vacuum line or water pump.
If you are using a vacuum line, make sure that the vacuum is not too high. Keep the tap partially open to avoid this. High vacuum in the system can lead to bumping in the flask and loss of the sample through the vacuum line. High vacuum also makes removing the vacuum line difficult, which can result in the silica running dry when the vacuum is not removed quickly enough. For these reasons, a water pump is preferred to a high-vac line.
To run a silica plug you will need:
Fritted funnel
Several round-bottomed flasks (4–6 is a good guideline. It is always best to have more to hand than you actually need)
Solvent(s) to be used
Vacuum line or water pump
Method:
- Clamp a round bottom flask and place the fritted funnel on top.
- Add a layer of sand (approx. 0.5 cm) to the funnel.
- Add the silica to the funnel as a slurry. Dry-pack method 2 can also be used, but with the of quantity silica and the width of the funnel, the slurry method is very quick and simple.
- Tap the side of the funnel gently with a cork ring or piece of vacuum tubing to help settle the silica and remove any bubbles.
- Add solvent until the funnel is almost full.
- Attach the vacuum line briefly to the side arm of the funnel. Remove it when the solvent level is about 2–3 mm above the level of the silica.
- Allow the solvent to drain under gravity until it is level with the silica.
- Rinse the sides of the funnel by pipetting solvent down the sides. Take care not to disturb the surface of the silica.
- Load the sample onto the silica by pipetting it evenly onto the surface of the silica.
- Add enough solvent to ensure the silica does not run dry during the next step (approx. 5 mm above the silica level should be sufficient).
- Change the round bottom flask for an empty one.
- Add more solvent slowly so as not to disturb the surface.
- Apply a vacuum until the solvent level is about 2–3 mm above the level of the silica.
- Repeat steps 10–13 as required.
- Test each fraction by TLC to determine which contains the desired product.
Micro-column
If you have a small sample (< 50 mg) that only has minor impurities in it, running a micro-column could save you from having to do a full column. Micro-columns, as the name implies, are miniature columns that are quick to run. They are also ideal for separations that require a solvent gradient as the solvent is added in small amounts so it is often possible to separate compounds with very similar Rf values in this way.
A micro-column is made by using a normal, disposable, glass Pasteur pipette and is set up in much the same way as a column (Fig. 6). A solvent system that gives a lower Rf value than usual should be selected, that is, an Rf value of 0.2 is suitable for a micro-column, compared with that of 0.3 for a full column.
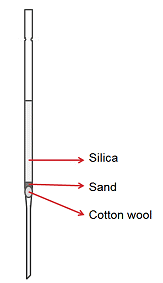
Figure 6. The set-up for running a micro-column.
To run a micro-column you will need:
Disposable glass pipette (a second pipette can be used to help set up the first)
Cotton or glass wool
Silica
Sand (optional)
Pipette bulb (for flash chromatography)
Small funnel/paper funnel
Method:
- Secure the pipette in an upright position by using a clamp stand.
- Place a small ball of cotton or glass wool in the narrowest point of the pipette. A second pipette can be used to poke the ball into position. The ball should not be too densely packed as this will hinder the solvent flow.
- Add a small amount of sand to provide a level surface for the silica (optional). The sand should evenly cover the cotton or glass wool, but not be more than 2 mm thick.
- Pour dry silica into the pipette by using a small funnel or a paper funnel. Leave about 3–5 cm of silica-free space at the top.

- Add solvent to the top of the pipette and allow it to drain. A pipette bulb can be attached to the top and squeezed at this point to speed solvent flow and help the silica pack more densely.
- Add your compound and elute as usual. Use the pipette bulb to increase the pressure and flow rate.
- Refill the solvent frequently so that the silica does not run dry.
An added advantage with running a micro-column is that once it is completed, it can be disposed of in a sharps container without needing to be cleaned.
Summary
This concludes our examination of column chromatography. You should now be able to choose which solvent system your sample requires, decide which size column to use, and know how much silica is needed. Once you have selected these, you need to pack your column carefully, as air bubbles and cracks in the silica can undo all of the careful preparation you have done in selecting your apparatus. We have seen that the size of the collected fractions depends on the column size and Rf value and that the solvent flow rate can affect separation. We have also looked at some of the common problems that you might encounter and ways to solve or even avoid them – and columns – by using one of the “quick and dirty” techniques.
Finally, one last piece of advice for running a column: Do not throw ANYTHING away until you are completely sure that the fractions you have are the ones you want. It’s all too easy to assume that the spot that is only present in one fraction is a minor impurity when in fact it is the product you’ve been trying to get for the last few days/weeks/months.
Glossary of common terms used during column chromatography
For Columns |
|
|
Column Chromatography |
A method used to purify individual chemical compounds from mixtures |
|
Flash Column Chromatography |
Column chromatography performed under external pressure applied by compressed air or N2. This has become the standard technique, with column chromatography often being referred to as gravity chromatography to distinguish it. |
|
Stationary Phase/Absorbent/Silica |
The solid material used in a column. Normally silica (SiO2), but occasionally alumina (Al2O3). |
|
Mobile Phase/Solvent/Eluent |
The liquid poured down the column. |
|
Mesh value |
The mesh value describes the size of the stationary phase particles. High mesh values mean smaller particles. |
|
Alumina type I, II, or III |
Alumina is available in three types depending on its water content. Type I has the least water, type III the most. |
|
Band/Spot/Eluate |
The section of the column that contains compounds. Band is used to refer to the actual column, while spot is used to describe TLC. |
|
Band widening |
Diffusion processes in the column cause the sample to spread. This band widening is unavoidable but can be minimized by reducing the time the sample spends on the column. Correct optimization of all parameters will minimize band widening. |
|
Tailing/Smearing/Streaking/Smurging |
All terms used to describe excessive band widening on the column or TLC plate that causes your bands or spots to run together. |
|
Packing a column |
The process of setting up a column. Includes adding silica, solvent, and ensuring that the silica is well-compacted with no bubbles or gaps. |
|
Loading a column |
The process of adding your sample to the top of the column. Wet loading involves dissolving your sample in a minimum amount of solvent and pipetting it onto the top of the silica. Dry loading is described in the article above. |
|
Running a column |
The process of collecting and testing fractions as they elute off the column. |
|
To elute |
Literally: To wash out. Used in chromatography to mean “to come off the column”. |
|
Fractions |
Portions of solvent collected from the bottom of the column. Usually collected in test tubes in volumes of 10–50 mL. |
|
Solvent system |
A combination of two or more solvents used as the mobile phase. |
For TLC |
|
|
Thin Layer Chromatography (TLC) |
Chromatography performed with a glass or aluminium sheet or plates coated with a thin layer of silica or other stationary phase. Used as a quick guide for column and flash column chromatography. |
|
Capillary TLC Spotter/Spotter |
An implement used to add a sample to a TLC plate. (See: How to make a Capillary TLC Spotter) |
|
Rf Value |
A measure of how far a compound or solute moves in a given solvent or solvent system. |
|
Solvent front |
The leading edge of the solvent. This moves down a column but up a TLC plate |
|
Baseline |
In TLC, the line on which the sample is spotted. Also the top of a column where the sample is loaded. |
|
Resolved/resolution/separation |
Measure of how well each component in the sample is isolated from the other components. Good resolution or separation means that each component can be cleanly and easily collected in separate fractions. |
|
Often used in labs, but should be avoided in formal writing/speech. |
|
To column/Columning |
Can be used as a verb in the lab, but should be avoided when writing up. The preferred phrase in papers is “X was purified by column chromatography” or “X was purified by flash column chromatography”. |
|
To run dry |
When the solvent level drops below that of the silica. This can introduce bubbles and cracks into the silica, which disrupts the separation of compounds. |
Further reading:
- High-Performance Gradient Elution,
Lloyd Snyder, John Dolan,
John Wiley & Sons, New York, USA, 2006.
ISBN: 978-0-471-70646-5
Also of interest:
- Introduction to Modern Liquid Chromatography,
Lloyd Snyder, Joseph Kirkland, John Dolan,
John Wiley & Sons, New York, USA, 2010.
ISBN: 978-0-470-16754-0
Do you have any tip or tricks for the perfect column? Share them in the comments section …


The content is good
But what should I do, if the column needs to work continuously for several days?