
Column chromatography is a commonly used purification technique in labs across the world. Done right it can simply and quickly isolate desired compounds from a mixture. But like many aspects of practical chemistry, the quick and efficient setting up and running of a column is something that can take years to master. Here we present some of the tips and tricks of the trade to help you optimize all the experimental parameters to get the best separation of your compounds.
Columns are generally used in organic and inorganic labs to remove unreacted starting material or isolate one desired product from a range of by-products after a reaction has been performed. To do this, the mixed sample is passed down a vertical glass tube packed with silica or alumina and collected in small portions, or fractions, at the end. The various components of the sample are separated into their different compound types through interaction with the solvent and the silica. Polar compounds will interact with the silica more strongly than non-polar ones so will come off the column, or elute, after non-polar compounds. When a sample contains compounds with similar polarity, the separation between then can be small and recovering all of your clean sample can become a challenge.
While correctly packing your column is arguably the most important experimental factor, there remain several other factors that can be optimized to help you achieve the best separation possible in the shortest amount of time. Here we guide you through how to choose the best solvent system for your sample, and look at how much silica you will need and in which size column.
Choosing a Solvent System
This is the most difficult choice to make and the most important. In every organic chemistry lab there are a range of solvents to choose from. So where do you begin?
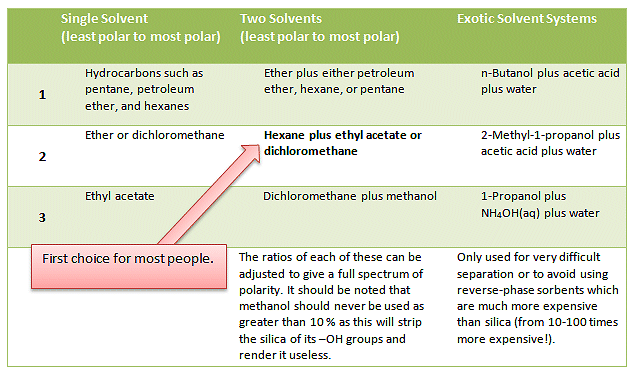
Column chromatography, particularly flash chromatography, is normally carried out with a mixture of two solvents as the mobile phase: one polar, one non-polar. Occasionally, a single solvent can be used or a mixture of three solvents is needed.
Many people have their favorite solvents systems and will automatically start with these and adjust the mix as needed. Common solvents and solvent systems are given in Tab. 1.
Table 1. Common solvents and solvent systems for column and flash chromatography.
 To get a good separation between your product and any impurities and, where possible, to use as little solvent as possible, the key is to test potential solvent systems before setting up your column. To do this, you will need to run thin layer chromatography (TLC) using glass or aluminium sheets coated with silica (the aluminium sheets are cheaper, so are more common).
To Run a Test TLC
You will need:
TLC sheet
Scissors/Stanley knife/box cutter
Pencil
Glass container such as a small beaker with watch glass or petri dish as a lid
Solvent(s) to be tested
Capillary TLC spotter or micropipette (see: How to Make a Capillary TLC Spotter)
Tweezers
UV lamp or potassium permanganate dip to visualize
Method:
- Cut the TLC sheet into strips approximately 2 cm x 7 cm.
- Draw a pencil line on the short side, approximately 0.5 cm from the bottom. Do not use pen as the ink will dissolve in the organic solvent and separate out, obscuring or contaminating your results.
- Pour the solvent(s) to be tested into the glass container. The solvent should be 2–3 mm deep so that the spotted sample and the line are not submerged. This ensures the sample does not dissolve into the solvent and travel up the TLC plate with the solvent.
- Use a capillary spotter or micropipette to “spot” some of your sample onto the line: Touch the spotter or pipette to the silica TLC plate gently and allow capillary action to draw the sample down onto the plate. It is better to touch the spotter to the TLC 2–3 times for short amounts of time (> 1s) than to hold it against the plate for a longer time. The resulting spot should be 1–2 mm in diameter.
- Stand the TLC strip in the container with the solvent(s).
- Wait and check regularly. Do not move or disturb the plate or the TLC container as this will cause ripples in the solvent and irregular progress of the solvent front up the plate.
- When the solvent front is 0.5–1 cm from the top of the plate, carefully remove the plate from the container with tweezers.
- Allow the solvent on the plate to evaporate, and then visualize the plate by using either a UV lamp or potassium permanganate dip.
- Mark in pencil where the spots are as the initially intense colors from the permanganate dip can fade over time and it is hard to manveuver to measure a Rf value (see below) under a UV lamp.
You can now determine whether your sample components will separate in the selected solvent. If you get poor separation, choose another solvent system and try again.
What is Good Separation?/What Am I Looking For on my TLC?
The end result should be a solvent system that moves the target compound about 1/3 of the total solvent path (Rf value between 0.25 and 0.35, Fig. 1).
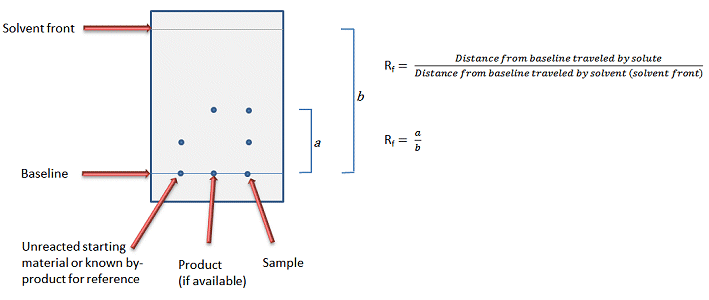
Figure 1. Typical TLC plate layout and definition of Rf value.
A solvent system that gives an Rf between 0.25 and 0.35 is recommended as it gives the sample time to equilibrate on the column and thereby be fully resolved into all its component parts. Don’t be tempted to use a solvent system with a higher Rf – especially if this is the only solvent system you have tested – as a fast elution can result in an impurity being masked by another spot (Fig. 2).
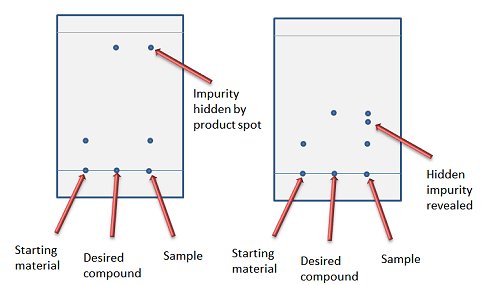
Figure 2. Choice between fast elution (left) and missing a hidden impurity (right).
While it is possible for a spot to have a Rf that is too high, the opposite is also true if the desired compound is one of the later-eluting spots. Here it is possible for the spot to be too slow-moving (low Rf). Fig. 3 shows the desired spot barely moves off the baseline while the impurities race ahead. You may be tempted to use this solvent system to avoid the potential contamination that comes with a worse separation but a higher Rf for your product. This will normally prove to be a mistake. The longer your compound spends on the column, the more chance it has to degrade and the less product you will recover. Trying to isolate a compound with a low Rf value will also take a long time and a lot of solvent. In this case, it is better to attempt a slightly messier separation and use more silica (see below).
.gif)
Figure 3. Clean separation (left) versus faster elution (right) when product is second spot.
When you have found a solvent system that gives reasonable separation, you should take a few moments to look at the shape of the spots. Ideally, the spots should be round and distinct from each other (Fig. 4, 1). Spots with long tails on a TLC plate can translate to wide bands and possibly to overlapping compounds on the actual column. If you have tried several solvent systems and cannot find one that gives perfectly round spots, don’t worry. As long as the separation between the spots is good (Fig. 4, 2), you will still get good separation on the column. In situation 3 in Fig. 4, it is still possible to get a clean sample of the top compound, for characterization for example, but you will lose some of your product as it tails into the following band on the column. This is not recommended if the yield is important.
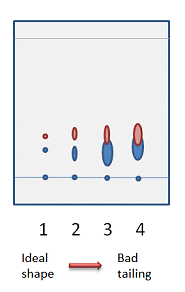
Figure 4. Possible spot shapes on a TLC plate.
Other Factors to Consider When Choosing a Solvent System
You will sometimes find that two or more solvents systems give adequate separation of your compounds or you will see people run a column with a solvent system that gives adequate, but not the best separation on the TLC plate. So what affected their decision?
There are two other factors to consider: price and boiling point.
Price
If two solvent systems give similarly good separation, the cheapest of the non-halogenated solvents should be used. Typically, this will result in a hexanes:ethyl acetate mixture. If you are unsure of the relative cost of a solvent, a good rule of thumb is to look at the size of the container. Cheaper solvents are generally purchased in larger quantities than their more expensive counterparts.
It is worth noting here that some cheap hexanes or petroleum ethers, especially those in plastic containers, often contain saturated hydrocarbons that are hard to remove and can make interpretation of NMR spectra difficult, especially in the 1–1.5 ppm range. In these cases, the solvent can be distilled prior to use (time consuming), or you can use a better-grade solvent (more expensive).
Boiling Point
The argument for choosing between two solvents with similar separation and different boiling points is simple: Always chose the lower boiling solvent. You will save yourself a lot of time and effort in the long run as higher-boiling solvents will take longer to evaporate and require heating or reduced pressure to remove when you try to recover your compound from solution.
Choosing the Correct Size Column
Some would argue that this is the least important factor when setting up a column. Indeed, in theory it is possible to use a very thin column with a long length of silica or a thick column with shorter length of silica to equal effect (Fig. 5).

Figure 5. Choice of column size is less important than the amount of silica used.
However, in practice, most people will choose a column size that allows them to fill column approximately one-third to a half full of silica – not including the solvent reservoir (Fig. 6). This, of course, depends on how much silica you will be using.
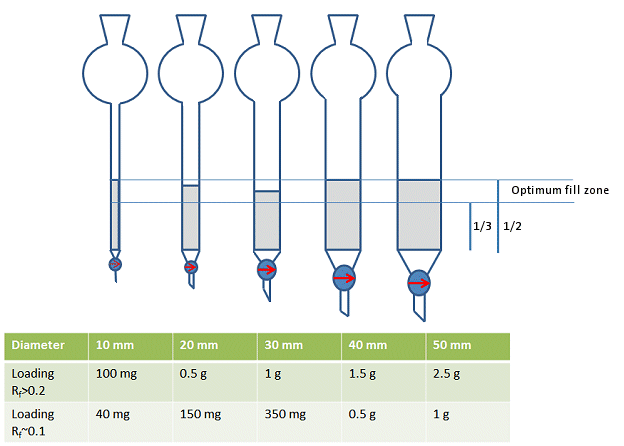
Figure 6. Rough guide for choice of column diameter.
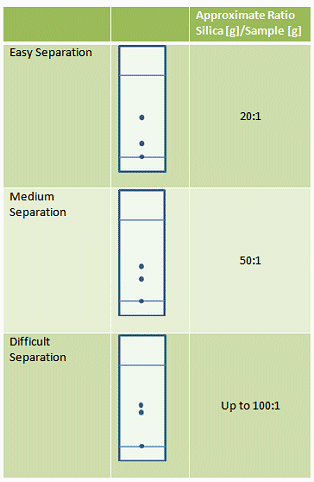
How Much Silica Do I Need?
How much silica you need is determined by how much of your sample you have to separate. The ratio of silica to sample does not have to be exact, but should be in the right area to prevent waste of both time and resources. It is also advisable to measure the silica by weight rather than volume as the density of silica can vary depending on type.
The other factor affecting the amount of silica required is how easy or difficult the separation is going to be. This is determined by running TLC as part of the process of choosing a solvent (see above).
The harder the separation, the larger the silica weight to sample weight ratio will be. Good guidelines are given in Tab. 2.
Table 2. Guidelines for silica to sample ratio depending on the ease of the separation to be performed.
What Next?
Once you have your solvent system picked out, know how much silica you need, and have found a column of a suitable size, you are ready to begin packing your column. Of course, every column is unique and not all will give TLC results like the idealized ones shown here. In part three we will look at some trouble shooting techniques for common problems and some “quick and dirty” alternatives to running a full column.
Further reading:
- High-Performance Gradient Elution,
Lloyd Snyder, John Dolan,
John Wiley & Sons, New York, USA, 2006.
ISBN: 978-0-471-70646-5
Also of interest:
- Introduction to Modern Liquid Chromatography,
Lloyd Snyder, Joseph Kirkland, John Dolan,
John Wiley & Sons, New York, USA, 2010.
ISBN: 978-0-470-16754-0
Do you have any tip or tricks for the perfect column? Share them in the comments section …


Nice!
This is a very useful and simply, yet precisely put explanation on running a TLC! Thank you fo rthe good job!
I look forward to reading other articles and advises that you have written on matters separation techniques, tricks and solutions!
its systematic, simple and clear explanation. my supervisor recommended it for me. thank you for your efforts.
ALI
Thank you. We are happy to hear that you find the article useful.
Could you please give us example on how to decide the flow rate based on Rf on TLC?