
Recrystallizations for purification purposes are a well-known and widely applied technique, but growing crystals suitable for single crystal X-ray diffraction (XRD) is less well known and is more of an art than a science. The most promising crystals for XRD are transparent and have sharp edges. Ideally, crystals are 0.2–0.4 mm in at least two of the three dimensions. There are no hard and fast rules for growing such crystals, but here we present some tips and tricks to maximize your chances of obtaining the perfect crystal.
As we saw in part 1, the best crystals grow when there are no disturbances. A few large, good quality crystals are better for XRD than lots of small crystals and this means few nucleation sites, and allowing the crystals plenty of time to grow. In part 2 we looked at techniques that are mostly suitable for air-stable compounds, but can be adapted for air-sensitive compounds – those that react with the air or moisture in the atmosphere and must therefore be kept under an inert gas such as N2 or Ar. In this final part, we examine three techniques that are ideal for air-sensitive compounds, but can also be used for air-stable ones.
Equipment (For Air-Sensitive Compounds)
Most of the techniques described in this section require the use of Schlenk flasks and a Schlenk line or vacuum gas manifold. The Schlenk line consists of two manifolds (Fig. 1), one attached to a vacuum pump and the other to a source of inert gas. It allows Schlenk flasks to be evacuated of air and moisture and refilled with the inert gas via the side arm of the flask. The side arm is fitted with a PTFE (polytetrafluoroethylene) or ground glass stopcock which allows the flask to be isolated from the atmosphere.
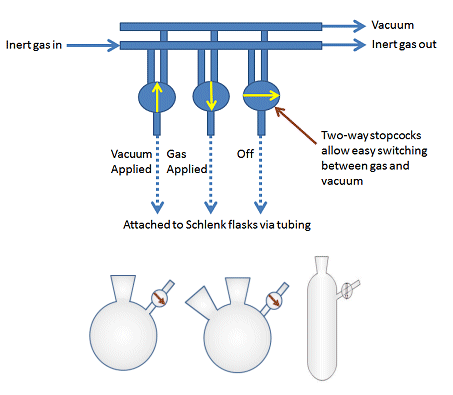
Figure 1. Basic Schlenk line and types of Schenk flask available.
Standard air-sensitive techniques and procedures, such as the use of rubber septa and syringes, or a cannula, to transfer liquids and solutions, and maintaining a positive flow of gas whenever the stopper or septum is removed, are required to ensure exclusion of air and moisture from your sample. A full description of these techniques is beyond the scope of this article, but they will be explored in upcoming articles on ChemistryViews.org.
For air-stable compounds, an NMR tube can be used for the layering technique (see below) and disposable glass vials can be employed for both the layering and vapor diffusion techniques to good success.
Techniques
Growing crystals is an art – sometimes referred to as the “dark art” of the lab. Every person who regularly grows crystals will have their own technique, procedure, and good-luck rituals. While each person may do small things differently, the procedure used will be loosely based on one of the techniques described here.
Every substance has a specific saturation point in each solvent. This is the concentration at which no additional solid (solute) will dissolve in the solvent at a given temperature. Each technique for growing crystals relies on creating a situation where the solute can no longer dissolve in the solvent. This usually involves preparing a saturated solution then altering the conditions, such as temperature and volume of solvent, so that the solvent is unable to contain the material in it. If the change is slow enough, the solute molecules have time to arrange themselves and pack closely, creating a well-defined crystal.
Liquid/Liquid Diffusion or Layering Technique
This technique involves the slow diffusion of one solvent into another. Two solvents are added to a vessel so that they form distinct layers (Fig. 2). A solvent in which the compound is moderately soluble is chosen as the first solvent and forms the bottom layer. A less dense solvent, in which the compound is insoluble, is chosen as the second solvent and forms the top layer. Solvent 2 gradually diffuses into solvent 1, creating a solvent mixture with lower solubility for the compound than that of pure solvent 1. As solvent 2 increasingly diffuses into solvent 1, the solubility decreases more and more, forcing the product to precipitate, which, with a bit of luck, forms crystals at the liquid/liquid boundary.
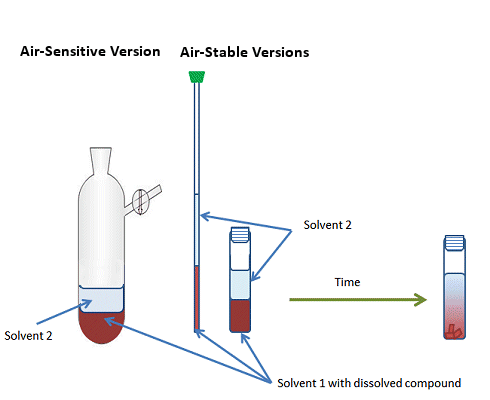
Figure 2. The liquid/liquid diffusion or layering technique for growing crystals.
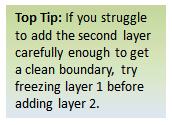
This technique requires some skill and a steady hand as the second solvent must be added slowly and carefully on top of the first solvent so that the liquid/liquid boundary is clear and distinct. This ensures diffusion of solvent 2 into solvent 1 will be slow, which in turn decreases the solubility slowly, allowing large, good quality crystals to grow. For this reason, narrow Schlenk flasks or NMR tubes are preferred as it is easier to build up layers when the surface area of the boundary is small. For air-stable compounds, a narrow vial can be used. This technique is suitable for milligram-scale crystallizations.
You will need:
Schlenk flask (for air-sensitive version), or NMR tube or narrow vial (for air-stable version)
Solvent in which the compound is moderately soluble (solvent 1)
Solvent in which the compound is insoluble (solvent 2)
2 x Pasteur pipette (for air-stable version) or syringe (for air-sensitive version)
Method:
- Dissolve your compound in solvent 1 and add the solution to either the Schlenk flask, NMR tube, or vi
 al using a Pasteur pipette or syringe as appropriate.
 - Use a clean Pasteur pipette or syringe to add solvent 2 on top of solvent 1: Place the tip of the syringe or pipette on the side of the vessel above the meniscus of solvent 1. Run solvent 2 down the side of the vessel taking care not to allow any drops to fall into the solution and disturb the liquid/liquid boundary. The boundary will initially be cloudy but a clear layer of solvent will gradually build up. Add roughly an equal amount of solvent 2 to solvent 1.
- Transfer NMR tube/vial/flask to safe location and wait.
A common solvent system for layering is a combination of dichloromethane and ethanol. This is often a successful combination. Other successful combinations are chloroform or dichloromethane with diethyl ether or a hydrocarbon.
Vapor Diffusion Technique
This involves the diffusion of the vapor of a volatile solvent, in which the compound is not soluble, into the solvent containing the sample to be crystallized. The theory behind it is similar to that of the layering or liquid/liquid diffusion technique: The vapor of the volatile solvent diffuses into the sample, decreasing the overall solubility for the product and forcing the product out of solution. It is applicable to milligram quantities of sample.
Air-Stable Version
For air-stable compounds, two vials are used: One wide one and a narrower one that will fit inside the wider one (Fig. 3). The solution with the compound is placed in the inner vial. The solvent in the inner vial should be less volatile than that in the outer vial. Good examples for the solvent for the inner vial are tetrahydrofuran (THF), benzene, chloroform, toluene, acetonitrile, methanol, or dichloromethane. For the outer vial, volatile solvents such as pentane, diethyl ether, or hexane are often used. The outer solvent gradually diffuses into the inner, precipitating the product, which forms crystals.
.gif)
Figure 3. Vapor diffusion technique for air-stable compounds.
Air-Sensitive Version
This technique is easily adaptable for air- and/or moisture-sensitive compounds. Rather than placing two vials one inside the other, two Schlenk flasks are connected by an unobstructed glass tube with the relevant quick-fit joints at each end (Fig. 4).
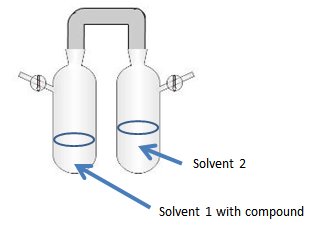
Figure 4. Vapor diffusion set-up for air- and/or moisture-sensitive compounds.
The solution with the compound, solvent 1, is prepared by using standard air-sensitive techniques – that is, using dry and degassed solvents, evacuating and refilling the flasks with inert gas before use, and always having a back pressure of inert gas when removing the stopper. A more volatile solvent, solvent 2, also prepared using air-sensitive techniques, in which the compound is not soluble, is placed in the second Schlenk flask and allowed to diffuse into the first flask in the same way as described above.
Suitable solvents are tetrahydrofuran (THF), benzene, chloroform, toluene, acetonitrile, methanol, or dichloromethane for solvent 1 and pentane, diethyl ether, or hexane for solvent 2.
Sublimation
Sublimation involves heating the sample under reduced pressure until it vaporizes and allowing it to undergo deposition on a cool area of the vessel (Fig. 5). As the material is deposited on the cool surface, it forms crystals.
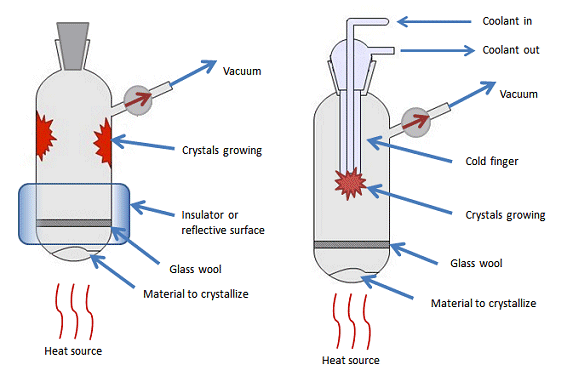
Figure 5. Two common set ups for growing crystals by sublimation.
A layer of glass wool is added above the compound to ensure the material stays at the bottom of the flask and cannot act as a nucleation site. Heat is applied by using an IR lamp or a heat gun. A cold finger can be added, with cool running water or solid CO2, to provide somewhere for the crystals to grow (Fig. 5, right). A cold finger is useful when the compound sublimes close to room temperature. In this situation deposition also occurs close to room temperature and you need active cooling to encourage deposition rather than the passive cooling of the air circulating near the walls of the flask.
Sublimation can be performed under static or dynamic vacuum depending on the volatility of the compound.
Despite its suitability for air-sensitive compounds, this technique is not often used. It is more complicated to set up than the layering and vapor diffusion techniques and so is usually seen as a last resort. There is also a risk of thermal decomposition of your compound, which is avoided with the other techniques.
What To Do Once Crystals Form
Once you have crystals in your vessel, remove the remaining solvent with a syringe or Pasteur pipette. Rinse the crystals with the minimum amount of a cool solvent in which the compound is insoluble and remove this solvent as before. If the compound is air-stable, remaining excess solvent can be removed by blotting the crystals on a piece of clean tissue paper. The crystals should be handled carefully with either tweezers or a spatula. Once they are dry, they can be submitted for single crystal X-ray diffraction.
If the compound is air-sensitive, the crystals are cleaned as described above, although a cannula is used to transfer the solvent by using standard air-sensitive techniques. The crystals can then be dried under very light reduced pressure, but be careful! Applying high vacuum or prolonged vacuum to your crystals can remove the solvent that co-crystallized with the compound. Co-crystallized solvent is always present in crystals recrystallized from solution – it forms part of the crystal lattice and in most cases it is best not to attempt to remove it. Removing it under vacuum will disrupt the crystal packing – something to keep in mind when analyzing the results.
Summary
Single crystal X-ray diffraction is an excellent way to characterize a compound, but growing crystals that will give you good data is a skill and an art. There are a range of techniques that you can try, all of which require patience and luck. Checking on the progress of your crystals every day is counterproductive – crystals need time and no disturbances to grow. If after two weeks no crystals have formed in your sample, it may be time to reconsider your solvent or crystal growing technique and try another method. There are many parameters that you can change with each attempt so don’t give up if your first few attempts fail. This is one area where experience and experimentation breeds success.
Further reading:
- Two-dimensional X-ray Diffraction,
B. B. He,
John Wiley & Sons, New York, USA, 2009.
ISBN: 978-0-470-22722-0
Also of interest:
- X-Ray Photoelectron Spectroscopy,
Paul Van der Heide,
John Wiley & Sons, New York, USA, 2011.
ISBN: 978-1-118-06253-1
Do you have any tip or tricks for growing the perfect crystal? Share them in the comments section …