Vacuum/inert gas manifold systems, commonly called Schlenk lines, are ideal for handling compounds that react with O2, water, or CO2. Their design allows compounds to be handled and reactions to be performed under an inert atmosphere of argon or nitrogen. Specially adapted glassware with standardized Quick-Fit joints gives a highly modular and flexible system that enables a variety of experimental set-ups.
While Schlenk lines are conceptually simple, at first glance the mass of tubing and exotic glassware can be daunting for the first-time user. In previous articles, we looked at basic Schlenk line design, how to start and stop a Schlenk line, and how to dry and degas solvents and the evacuate-refill cycle for preparing glassware for use on the Schlenk line.
Here we present some basic experimental set ups for performing reactions with air-sensitive compounds. In the final part, we will look at the isolation and analysis of your air-sensitive product(s).
Setting up a Reaction
Every reaction requires the addition of several reagents, often in a proscribed order. When performing an air-sensitive reaction, adding the reagents without introducing air or moisture into the system takes care and skill. How to add each reagent depends upon the nature of the reaction.
Reactions can be air-sensitive in terms of reagents, such as n-BuLi or Grignard reagents, or it may be that only the product of the reaction is air-sensitive, for example, an organometallic complex.
Important! Make sure you have read the safety considerations in part 1 before commencing work.
Experimental Set-Ups
Reactions are set up in the same way as non-air-sensitive reactions, but with either a three-necked flask or Schlenk flask instead of the traditional round-bottomed flask. Schlenk flasks have a tap to connect the apparatus to the Schlenk line and control the access to inert gas or vacuum, while a three-necked flask requires an additional adaptor for this purpose. The simplest way to set up a reaction is to assemble all the glassware first and then apply the evacuate and refill cycle to ensure an inert atmosphere before adding the reagents. However, it is possible to evacuate and backfill each piece of equipment separately and assemble the kit with a positive flow of inert gas coming from each piece of glassware, i.e., there is sufficient gas flow into the apparatus that a steady stream is emitted when a stopper is removed, for example. This is more time consuming, but can be a useful technique if you need to add or remove a piece of glassware mid-way through an experiment (see below). Typical reactions set-ups are shown in Fig. 11.
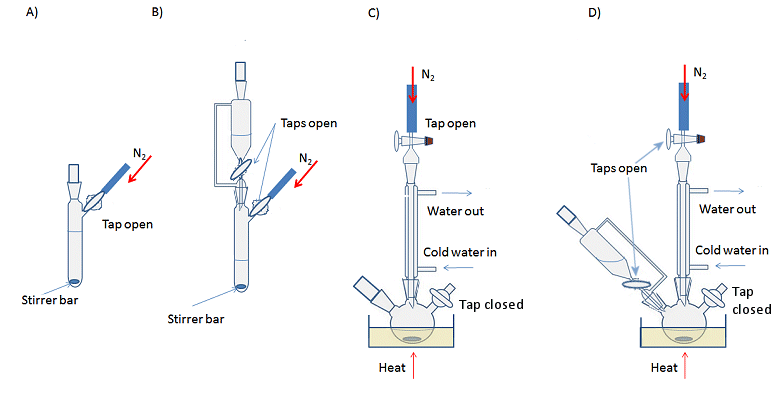
Figure 11. Typical experimental set-ups for air-sensitive reactions. A) Basic, room temperature reaction with stirring; B) Room temperature reaction with addition funnel; C) Heating at reflux with stirring; D) Heating at reflux with an addition funnel.
Another difference compared with air-stable chemistry is that all the ground-glass joints must be greased to ensure an air-tight seal and prevent contamination by O2, for example. In organic chemistry labs, it is often recommended to leave joints ungreased as grease can enter the reaction mixture and contaminate the reaction and spectra. For similar reasons, joints should not be over-greased when doing air-sensitive chemistry. A fine layer of grease applied evenly is better than a thick layer that seeps out of the top and bottom of the joint. To get a thin layer, apply two stripes of grease, on opposite sides of the male joint of any glassware, insert into the neck or female joint and rotate the two parts gently to evenly distribute the grease (Fig. 12). There should be a clear, continuous film between the surfaces of the joint.
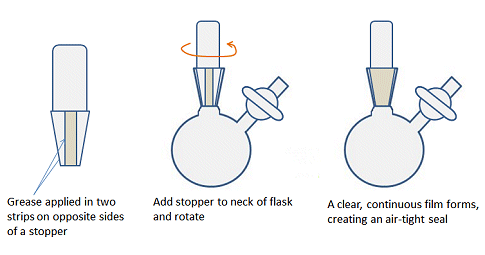
Figure 12. How to apply an even layer of grease to a joint.
Occasionally it will be necessary to add or remove a piece of glassware, such as an addition funnel, during the course of the reaction. To add a piece of glassware, ensure that it is clean and dry of any cleaning solvent or water and all joints are greased. Attach it to the Schlenk line and evacuate and backfill it three times as described in part 2. Ensure there are two positive flows of inert gas, i.e., the gas is flowing out of the vessel: one flow coming from the reaction vessel and the other from the glassware to be attached. Once there is a steady stream of inert gas flowing from each part of the apparatus, the stopper from the reaction vessel can be removed and the glassware added in its place.
To remove glassware during a reaction, simply ensure there is a positive flow of inert gas coming from the reaction vessel before removing the glassware and replacing it with a stopper or cap.
Adding Air-Stable Solids at the Beginning of a Reaction
A solid can be added at any stage of the reaction, however, if you can, add all the solids to the reaction flask first as manipulation becomes more difficult once a liquid has been added. If the solid is air-stable, it can be added directly to the flask at the beginning of the reaction as described below.
To add air-stable solids at the beginning of a reaction:
- Weigh the solid and add it to a clean and dry Schlenk flask or three-necked round-bottomed flask as appropriate for the reaction to be performed.
- Stopper flask with a greased, ground-glass stopper.
- Attach the flask to the Schlenk line.
- Open the flask to the vacuum carefully, taking care that the solid/powder is not sucked up into the line. This would result in less reagent being in the reaction than originally calculated and the line needing to be cleaned.
- Backfill the flask with the inert atmosphere from the Schlenk line as described in part 2. Repeat the evacuate-refill cycle twice more.
- Ensure the flask is filled with inert gas and open to the line so that there is a positive flow of gas before adding anything else.
Adding Air-Sensitive Solid at the Beginning of a Reaction
The best way to add an air-sensitive solid as the first reagent is to use a balance in a glovebox to weigh out the solid and put it in the flask, all under an inert atmosphere. Many air-sensitive solids are stored in a glovebox on a permanent basis.
The compound is taken into the glovebox with a clean, dry Schlenk flask, a stopper, a spatula, and something to weigh the solid into, for example, a plastic or aluminum weighing boat. These items are subjected to three evacuate-refill cycles in the port of the glovebox before being transferred to the main body of the glovebox. As the items will be subjected to vacuum, it is important to ensure that the Schlenk flask is open to the atmosphere and the vessel containing the air-sensitive solid is suitably secured. If not, there is a risk that the stopper will pop out of the Schlenk flask as the pressure drops and explode, resulting in broken glass and spilled air-sensitive compound in the glovebox port. Even if a sealed Schlenk flask survives the evacuate-refill cycles, opening it in the glovebox will contaminate the glovebox atmosphere with the external, lab atmosphere.
To use a glovebox to set up a reaction:
- Place items to be taken into glovebox into the port and close the door. Place the items as far into the port as possible. This will make it easier to reach them once you are in the glovebox.
- Evacuate and refill the port three times.
- Place your hands in the gloves of the glovebox and gently push your arms into the body of the glovebox. You will be pushing against the positive pressure of the glovebox atmosphere so go slowly to give the pressure time to adjust.
- Open the inside door of the port and bring your items inside the main body of the glovebox.
- Close the inside port door. This will protect the glovebox in case someone accidently opens the external door of the port.
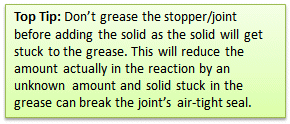
- Weigh out your compound(s) and add the desired amount to the Schlenk flask.
- Grease the stopper and seal the flask.
- Return all your items to the port and make sure you leave the glovebox in a neat and tidy condition.
- Close the inside door of the port.
- Open the external door and remove your items. You do not need to evacuate and refill the port on exiting the glovebox as all your air-sensitive compounds are under an inert atmosphere. Subjecting the closed flask to vacuum at this point risks the stopper popping out at best and the flask exploding at worst. Also the point of the evacuate-refill cycle is to prevent air and moisture entering the glovebox, not to prevent the inert atmosphere of the glovebox entering the lab.
The Schlenk flask can now be attached to the Schlenk line and more reagents or solvent added. Remember to evacuate and refill the tubing connecting the Schlenk line and flask before opening the flask to the line!
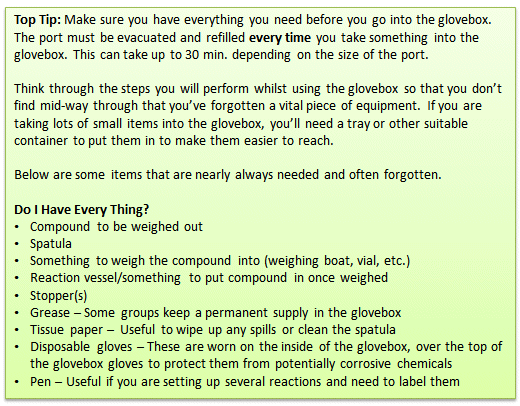
Adding Solids Mid-Way Through a Reaction
To add an air-stable solid
- Weigh the required amount of solid into a vial or weighing boat.
- Ensure there is a positive flow of inert gas into the reaction vessel. Make sure the vessel is open to the Schlenk line and that the bubbler has 2–3 bubbles per second flowing through it.
- Remove the stopper of the reaction vessel.
- Place a powder funnel in the open neck. This will prevent the solid sticking to the greased neck as it is added. If you don’t have a powder funnel, a piece of paper bent into a cone-shape will work just as well – just ensure the end is lower than the base of the neck.
- Carefully pour the solid into the reaction via the funnel. The positive flow of inert gas out of the flask may cause some of the solid, particularly if it is a powder, to be lost if the hole is blocked so add the solid slowly and in small portions if you are adding a lot of powder. Take care to avoid inhaling any airborne powder. Alternatively, hold the funnel so that the joint is inside the neck of the flask but there is gap between the joint and the neck. This will give the inert gas room to escape without blowing through the funnel and blowing the powder everywhere. The problem with this method is that you are more likely to get powder stuck to the greased neck of the flask.
- Remove the funnel and replace the stopper once all the solid is added.
To add an air-sensitive solid
Air-sensitive solids should be added in a glovebox as described above. Some reactions, however, are not amenable to moving the entire apparatus or the reaction vessel into the glovebox, for example, variable temperature additions. If this is the case, there are two possible approaches: A) using a solid addition tube and B) dissolving the solid to add as a solution.
A) Solid Addition Tube
A solid addition tube is a simple piece of glassware similar to a test tube but with a bend in it and with a ground-glass joint suitable for placing inside the neck of a reaction vessel (Fig. 13). Some have a Schlenk or Young’s tap to allow control of the internal atmosphere and gas flow.
The air-sensitive compound is placed in the tube in a glovebox (see above) and the tube is sealed with a cap or stopper depending on the type of joint (Fig. 13, A). Once outside the glovebox, the tube is attached to the Schlenk line using the standard procedure. The cap is the removed under a positive flow of inert gas and the tube is inserted into the neck of the flask also under a positive flow of inert gas (Fig. 13, B). The tube can then be rotated or gently tapped to encourage the solid to fall into the reaction vessel.
If you are using a solid addition tube without a tap, a secondary stream of inert gas can be introduced using the set-up shown in Fig. 3, C. This provides an inert-gas blanket during the opening and attaching of the tube to the flask. This technique is also useful if you need to open an ampoule of air-sensitive solid.
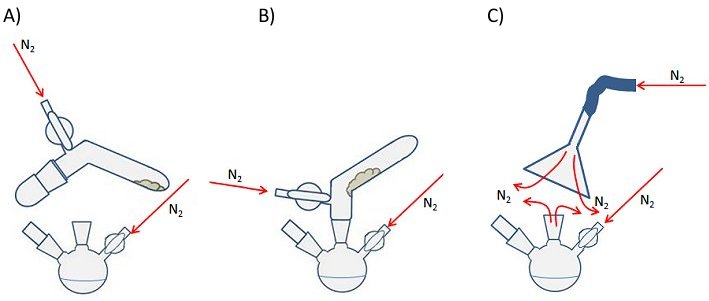
Figure 13. Use of a solid addition tube (left and center) and a secondary stream of inert gas (right) for the addition of an air-sensitive solid mid-way through a reaction.
B) Adding an Air-Sensitive Solid as a Solution
Perhaps the simplest and most effective way of adding an air-sensitive solid is to weigh it into a separate, clean, dry Schlenk flask under an inert atmosphere and dissolve it in a suitable solvent. The resulting solution can then be added to the reaction mixture via a cannula (see below).
Adding Solvents and Liquids
Liquids can be transferred to or from vessels attached to a Schlenk line and under an inert atmosphere easily with either a syringe or a double-ended stainless steel needle, called a cannula. Which you use will depend on the quantity and reactivity of the liquid to be transferred and, to a certain extent, the design of the container the liquid is being transferred from. As a general rule, up to 50 mL can be transferred with a syringe while larger quantities are usually transferred with a cannula.
Transferring Liquids with a Syringe
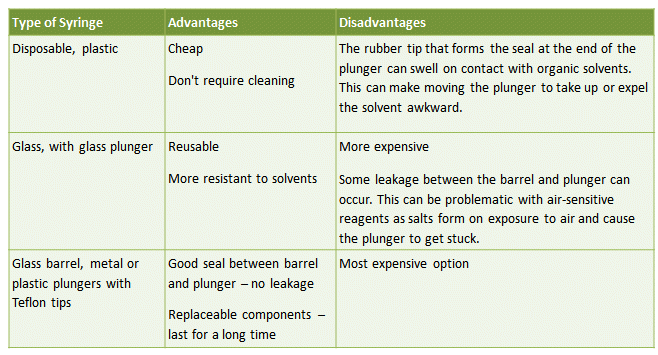
This is the simplest way of transferring a known amount of liquid from one vessel to another. Typical syringes consist of either a glass or plastic barrel with plunger and a long, flexible, stainless steel needle. Several types of syringe are available, with pros and cons for each (Tab. 3).
Table 3. The advantages and disadvantages of different syringe types commonly used for the transfer of air-sensitive liquids.
To transfer a liquid from a solvent flask to a Schlenk flask:
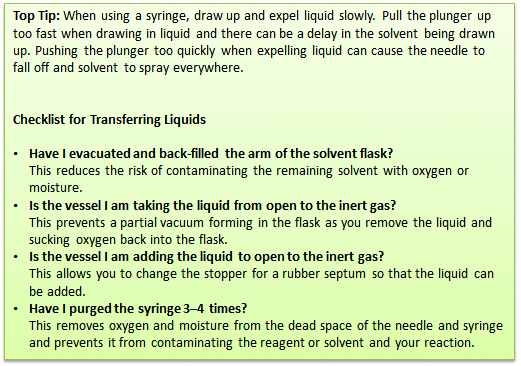
- Attach the solvent flask (flask 1, Fig. 14, A) to the Schlenk line and evacuate and backfill the tubing and arm of the flask three times.
- Attach receiving Schlenk flask (flask 2) to the Schlenk line and evacuate and backfill the flask three times.
- Open both flasks to nitrogen, i.e., open taps H and I so that nitrogen can flow into the flasks.
- Remove the stopper from flask 1 while under a positive pressure of nitrogen (i.e., nitrogen flowing out of the flask) and replace with a rubber septum (Fig. 14, B). A needle should be inserted through the septum to allow the small volume of air in the septum to be flushed out. This is called a bleed needle.

- Fold the septum over the joint so that it forms an air-tight seal (Fig. 14, C).
- Repeat steps 4 and 5 for flask 2.
- Purge the syringe by inserting the needle through the septum of the solvent flask and into the headspace of the flask. Draw up the inert atmosphere into the syringe. Remove the needle from the flask and expel the gas from the syringe (Fig. 14, D). Repeat 3–4 times. This must be done with a positive pressure of nitrogen as withdrawing gas or liquid from the system creates a partial vacuum which needs to be filled with inert gas before the external atmosphere leaks into the system and contaminates it.
- Insert the needle through the septum and into the body of the solvent. Pull the plunger back slowly and allow the syringe to fill with solvent. Draw up slightly more liquid than required into the syringe.
- Withdraw the needle from the solvent, but not from the flask.
- Carefully bend the needle so that the syringe is inverted and any gas bubbles move to the top of the syringe (Fig. 14, D).
- Gently expel any gas from the syringe and the excess liquid back into the flask.
- Fully remove the needle from the solvent flask and insert it into the receiving flask.
- Gently depress the plunger to empty the solvent into the flask. Depress the plunger carefully as going too fast can cause the needle to come off and solvent to spray everywhere.
- Remove the syringe from the flask and replace the rubber septum with the stopper if there is no more liquid to add.
- Remove the rubber septum on the solvent flask and replace the tap/stopper.
- The gas line to the solvent flask can now be turned off and the solvent flask removed from the line.
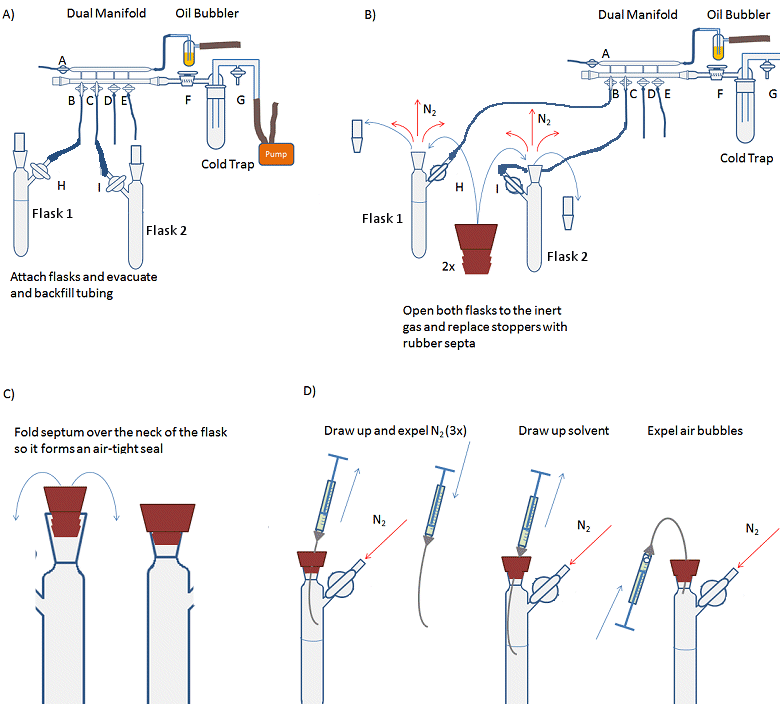
Figure 14. Procedure for transferring an air-sensitive liquid with a syringe.
Sure/Seal (TM) Containers
Air-sensitive reagents from commercial sources often come in a Sure/Seal(TM) container. In addition to a screw-top lid, these containers include a metal crown cap, like that of a beer bottle, but with a pierce-able center. With Sure/Seal(TM) containers, it is very important to introduce a source of inert gas into the bottle before withdrawing any liquid (see below).
As described above, this prevents the buildup of a partial vacuum as the liquid is removed, and the resulting leakage of oxygen from the atmosphere back into the container which can potentially ruin the reagent. The inert gas from the Schlenk line can be introduced by using a short, disposable needle attached to the tubing of the Schlenk line via an adapter or a 1 mL disposable syringe that has had the plunger removed and the end cut off. This will fit neatly into the flexible rubber or plastic tubing of the Schlenk line and can also be used for purging solvents by simply exchanging the short needle for a long one and following the instructions in part 2.
To transfer a liquid from a Sure/Seal(TM) container to a Schlenk flask:
- Open the Schlenk line with the short needle attachment to gas and allow it to purge for 2–3 min. You may need to increase the gas flow through the gas manifold to maintain a positive gas pressure if other items are connected to the line.
- Insert the short needle through the top of the Sure/Seal(TM) container.
- Follow steps 7–14 in the above section “To transfer a liquid from a solvent flask to a Schlenk flask” to purge the receiving syringe and draw up the required quantity of liquid.
- Once you have finished with the Sure/Seal(TM) container, remove the needle supplying the gas and replace the screw-top lid. The top of the Sure/Seal(TM) container can also be wrapped in parafilm before the lid is replaced. This will provide additional protection against contamination during storage.
Transferring Liquids with a Cannula
A cannula is a hollow piece of Teflon or stainless steel tubing – basically a double ended needle. They can have two flat ends, two sharp ends, or one of each. Cannulae are very useful for transferring large amounts of liquid from one vessel to another under an inert atmosphere. The process of cannulation relies of a pressure differential between the two vessels: the containing vessel should have higher pressure than the receiving vessel so as to “drive” the liquid into the receiving vessel (Fig. 15).
.gif)
Figure 15. Basic set-up and principles behind cannulation.
The pressure difference between the flasks is achieved by having a flow of gas into the containing flask and suitable pressure relief in the receiving flask, i.e., a needle. The buildup of gas pressure in the head space of the flask pushes down on the liquid, forcing it through the cannula to relive the pressure.
The main drawback of this technique is that transfer can be slow due to the small pressure difference between containing and receiving flasks. To ensure sufficient pressure buildup, new septa should be used whenever possible. Old septa that have been pieced multiple times do not form as good a seal which can lead to insufficient pressure buildup and slower or no transfer of liquids.
Another method to encourage transfer is to raise the containing flask above the receiving flask. The relative difference in heights results in the liquid flowing “downhill” with the aid of gravity and can speed the transfer.
An alternative method of inducing a pressure gradient between the flasks is to reduce the pressure in the receiving flask by the flash vacuum technique. Here, the receiving flask is opened to the vacuum for <1 s to reduce the pressure in the flask. The low pressure then causes the liquid to flow through the cannula.
The main drawback of vacuum transfer is that if there are any leaks, air will be drawn into the system. This is common with old septa and another reason why new septa should be used. Additionally, the pressure gradient evens out as the liquid is transferred into the receiving flask, causing the transfer to slow. The flask can be opened to vacuum during the transfer if this occurs, but this can result in evaporation of the solvent/liquid so a cold trap must be in place if you are attempting this method in order to catch any evaporated solvent before it reaches and damages the pump. Evaporation of solvent can be a problem if you are working with a solution of a known concentration and so the vacuum method should be avoided in favor of a positive buildup of pressure to drive the transfer.
To Transfer a Liquid Via a Cannula
- Attach the receiving flask to the Schlenk line and evacuate and backfill the tubing and flask three times.
- Open the receiving flask to the inert gas. Ensure there is sufficient gas flow through the line.
- Under a steady stream of inert gas, replace the stopper of the receiving flask with a rubber septum. A needle should be inserted through the septum to allow the small volume of air in the septum to be flushed out. This is called a bleed needle.
- Fold the top of the septum down over the neck joint to ensure a good seal.
- Replace the bleed needle with one end of the cannula. If the cannula only has one sharp end, this should go into the receiving flask.
- Allow the inert gas to flow through the cannula for 2–3 min to purge it.
- While the cannula is purging, attach the containing flask to the line.
- Evacuate and backfill the tubing connecting the containing flask to the line.
- Repeat steps 2 and 3 for the containing flask.
- Insert the other end of the cannula through the septum of the containing flask.
- Add a bleed needle to the receiving flask and close the tap to the Schlenk line.
- Lower the end of the cannula in the containing flask so that it is below the meniscus of the liquid to be transferred.
- Within a few seconds, transfer should begin: The pressure build up in the containing flask will push the liquid through the cannula into the receiving flask in order to relieve the pressure. The flow rate can be adjusted by controlling the flow rate of inert gas into the containing flask or by adding a bubbler with a pinch clamp attached to its tubing in order to slow the release of pressure from the receiving flask. Transfer can be stopped at any time by raising the end of the cannula out of the liquid.
- When the transfer is complete, raise both ends of the cannula so that they are not in the liquid.
- Open the receiving flask to the inert gas supply.
- Remove the bleed needle.
- Remove the cannula.
- Clean the cannula immediately. Not cleaning the cannula immediately can result in it becoming blocked, especially if you have been using it to transfer Grignard reagents or other solutions of air-sensitive compounds – as the air reaches the inside of the cannula, these compounds can react with the O2 or moisture and deposit salts or other solids which cause blockages. Take care to consider all safety implications when choosing which solvent to clean the cannula with – especially if it has been used to transfer Grignard reagents or n-alkyl lithium solutions.
Summary
Many experimental set-ups are possible with three-necked flasks and glassware with an additional tap or connector to provide an inlet for the inert gas and access to the vacuum for the evacuation and refill cycle.
Solids, whether air-sensitive or air-stable, should be added at the beginning of the reaction if possible. Adding solids mid-way through a reaction is trickier but can be done with solid addition funnel or tube. Liquids are added with a syringe if the quantity is under 50 mL or via a cannula if more than 50 mL is required.
- Next month: Isolation and analysis of your air-sensitive product.
- See all Tips and Tricks on air-sensitive chemistry
Do you have any tip or tricks for handling air-sensitive compounds? Share them in the comments section …



kindly give complete complete information about which type of require which type of setup how to set up that reaction