
Column chromatography is a commonly used purification technique in labs across the world. Done right it can simply and quickly isolate desired compounds from a mixture. But like many aspects of practical chemistry, the quick and efficient setting up and running of a column is something that can take years to master. Here we present some of the tips and tricks of the trade to help you set up the perfect column.
In a typical column (Fig. 1), the stationary phase, a solid adsorbent normally silica gel (SiO2) or alumina (Al2O3), is placed in a vertical glass column. The mobile phase, a liquid, is added to the top of the column and flows down through the column by either gravity or external pressure (flash chromatography). Separation of compounds is achieved through the varying absorption on and interaction between the stationary and mobile phases.
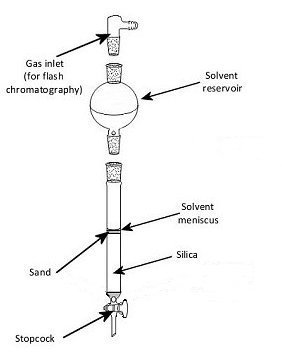
Figure 1. General column set up.
The quality of the separation depends on a variety of factors not least of which is the absence of air bubbles in the stationary phase. To prevent bubbles, the correct packing of a column is important.
1. Choice of Silica or Alumina for the Stationary Phase
Silica and alumina are both polar adsorbents so the more polar components in the mixture to be separated are retained more strongly on the stationary phase and are therefore eluted from the column last. Silica is recommended for most compounds, but as it is slightly acidic, it preferentially retains basic compounds. Alumina is slightly basic, so will retain acidic compounds more strongly. It is good for separation of components that are weakly or moderately polar and the purification of amines.
Absorbent particle size affects how solvent flows through the column. Silica or alumina are both available in a variety of sizes.
The size is given by the mesh value which refers to the number of holes in the mesh that is used to sieve the absorbent. Thus higher mesh values such as “silica gel 230–400” have more holes per unit area and correspondingly smaller particles than “silica gel 60”. Typically, 70–230 silica gel is used for gravity columns and 230–400 mesh for flash columns.
Alumina is available in types I, II, and III. This refers to the water content of the alumina, with I having the least water and III the most. A lower water content means there are more polar sites in the alumina free to bind organic compounds, and polar compounds will remain on the column longer. Alumina of activity II or III, 150 mesh, is most commonly employed.
The techniques for packing a column described below use silica as the stationary phase, but are equally suitable for use with alumina.
2. Preparing the Column
Some columns have glass frits (Fig. 2, 1) to prevent loss of the stationary phase out the bottom; others do not and will need to be plugged with either glass wool or cotton wool. Which you use is personal preference. Positioning the cotton or glass wool can be awkward at first, but glass frits are harder to clean and may be a source of impurities, such as silica leaking through the frit into the collected fractions. This can be prevented by adding a layer of sand between the frit and the silica. The porosity of frits can also vary. This means that the rate of solvent flow can be different for different columns. Very porous frits will leak more silica, but less porous frits have slower flow rates – sometimes too slow – and can lead to pressure build up in flash chromatography.
Figure 2. Fritted (left) and non-fritted (right) columns.
Fritted Column
- Find a clean, empty column of suitable size.
- Clamp the column securely and close the tap or stopcock (Fig. 2, 2).
- Add a layer of sand (approx. 0.5 cm, optional).
Non-Fritted Column
The ball of cotton or glass wool should be large enough to plug the bottom of the column, but not so large and densely packed that it restricts solvent flow (Fig. 3). A piece the size of the tip of your little finger should be suitable for most columns.
- Position the cotton or glass wool ball securely in the narrowest part of the column using a long glass rod or other suitable device.
- Clamp the column securely and close the tap or stopcock (Fig. 2, 2).
- Add a layer of sand until it reaches the main body of the column (approx. 2 cm, Fig. 3). This will give the stationary phase an even base and prevent concentration and streaking of the bands as they come off the column and are collected.
.jpg)
Figure 3. Guidelines for the correct size of cotton or glass wool and sand for non-fritted columns.
3. Filling the Column
There are several methods for filling columns. You may find one method easier or quicker than the others and always fill a column that way, or you may find that different size columns require different methods. All methods have their pros and cons and you may need to try all three to find the one that you prefer.
Option 1: Dry-Pack Method 1

You will need:
Column prepared as in section 2 above
Funnel suitable for dry solids
Something to tap the column with (see box below)
Solvent
Silica or alumina
Method:
- Fill the column with solvent, allowing some to run through the sand and cotton wool to remove air bubbles (Fig. 4, step B).
- Place a dry funnel in the top and gently pour the silica or alumina (stationary phase) into the solvent. Allow the solvent to drain to prevent overflowing (Fig. 4, step C).
- Let the stationary phase settle and gently tap the column (see box below) so that the silica or alumina will pack tightly into the column (Fig. 4, step D).
- Drain the solvent until the solvent level is just even with the surface of the phase (Fig. 3, step E).
.jpg)
Figure 4. Dry-pack method 1.
Option 2: Dry-Pack Method 2
 You will need:
Column prepared as in section 2 above
Funnel for solvent
Vacuum line
Solvent
Silica or alumina
Method:
- Add dry silica gel to the column and apply house vacuum by attaching the vacuum tubing to the bottom of the column (Fig. 5, step B). This will compress the silica gel and keep it compressed for the next steps. Packing can be improved by tapping the column.
- With the vacuum still applied, pour in the solvent (Fig. 5, step D).
- Allow the solvent to flow though the column until it is almost at the bottom. At this point, close the stopcock and remove the vacuum line (Fig. 5, step E).
- Allow 5–6 columns worth of solvent to flow through the column to ensure complete packing.
- Drain the solvent until the solvent level is just even with the surface of the stationary phase (Fig. 5, step F).
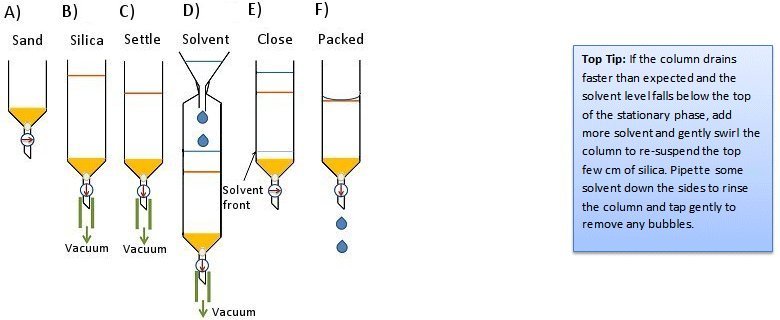
Figure 5. Dry-pack method 2.
Option 3: Slurry Method
 You will need:
Column prepared as in section 2 above
2x beakers or conical flasks
Glass rod or Pasteur pipette
Funnel suitable for wet solids
Solvent
Silica or alumina
Pasteur pipette
Method:
- Fill the column about one third with solvent (Fig. 6, step B).
- In a beaker, measure out the required amount of silica or alumina.
- In a separate flask or beaker, measure solvent approximately one and a half times the volume of silica.
- Add the silica to the solvent, a little at a time, while swirling. Use a Pasteur pipette or glass rod to mix the slurry.
- Pour or pipette some of the slurry into the column. Allow the solvent to drain to prevent overflowing (Fig. 6, step C).
- Tap the column gently to encourage bubbles to rise and the silica to settle (Fig. 6, step D).
- Continue to transfer the slurry to the column until all the silica or alumina is added.
- Rinse the inside of the column by pipetting solvent down the inside edge.
- Drain the solvent until the solvent level is just even with the surface of the stationary phase (Fig. 6, step E).
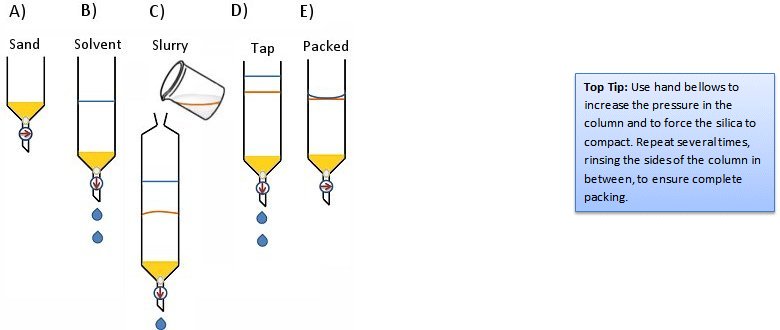
Figure 6. The slurry method.
You are now ready to load your column and isolate the desired compound.
4. Emptying the Column
Once you have your products isolated, all that remains is to empty and clean the column ready for next time. To speed up the process, elute all of the solvent using compressed air and allow air to flow through the column for approximately 2 h. This will give dry, free-flowing silica that is easy to pour into the silica waste container. Alternatively, elute all the solvent and secure the column upside down over a large beaker and allow to dry overnight in a fumehood.
Cleaning the column by rinsing with water and acetone is usually sufficient.
Do you have any tip or tricks for packing the perfect column? Share them in the comments section …


If you don’t have anything long enough to aid getting the cotton wool to plug the bottom of the column a ‘poking device’ can be made by stacking glass pipettes into each other and taping/parafilming them together, any length can be made and it works really well.
Even after tapping the glass for a while I can’t get all of the air bubbles out of the column when packing it. Any other tips in removing/preventing the bubbles in the column?
If that happens, it means your slurry is too thick, add more solvent and then pour the mixture into the column
How to correctly estimate dead volume when using n-hexane?
How to select the size of the column according to sample volume?
Is it possible to achieve the same level of separation efficiency with a column that has been hastily set up compared to one that has been meticulously fine-tuned over years of practice?”,
“refusal