
Vacuum/inert gas manifold systems, commonly called Schlenk lines, are ideal for handling compounds that react with O2, water, or CO2. Their design allows compounds to be handled and reactions to be performed under an inert atmosphere of argon or nitrogen. Specially adapted glassware with standardized Quick-Fit joints gives a highly modular and flexible system that enables a variety of experimental set-ups.
While Schlenk lines are conceptually simple, at first glance the mass of tubing and exotic glassware can be daunting for the first-time user. In previous articles, we looked at basic Schlenk line design, how to start and stop a Schlenk line, how to dry and degas solvents and the evacuate-refill cycle for preparing glassware for use on the Schlenk line. We have also looked at some basic experimental set-ups for performing reactions with air-sensitive compounds.
In this final part, we will look at the isolation and analysis of your air-sensitive product(s).
Isolation
There are two reasons for using air-sensitive techniques: One or more of the reactants are air-sensitive, or the product is air-sensitive. If the product is air-stable, its isolation and analysis is simple and can be done with standard organic techniques such as recrystallization, column chromatography, or filtration. If, however, the product of your reaction is air-sensitive, its isolation and analysis presents more of a challenge.
Important! Make sure you have read the safety considerations in part 1 before commencing work.
Solvent Removal
The most common form of isolation of an air-sensitive compound is to simply remove the solvent under vacuum. For this you will need a cold trap with sufficient liquid nitrogen coolant to catch the solvent and prevent it from entering the pump. When removing large quantities of solvent, two cold traps are recommended. See part 1 for more details.
The solvent is removed by carefully opening the side arm of the Schlenk flask to the manifold while vacuum is applied. Care should be taken when opening the tap as the solvent can “bump”, shooting up the side arm and the tubing. This not only loses some of your product, but can contaminate the tubing for future use. Bumping will also cause some of product to splash up the sides of the flask. This cannot be completely avoided and your product will often coat the sides of the flask. To keep as much of the product as possible at the bottom of the flask, the splashed product on the side can be redissolved with some of the remaining solvent to return it to the bottom of the flask. Simply swirling the flask to move the remaining solvent around the sides of the flask should do the trick.
The rate at which the solvent evaporates, of course, depends on its boiling point. High-boiling solvents may be encouraged to evaporate by placing the Schlenk flask in a room temperature water bath or a slightly warm water bath. For low boiling solvents it is quite common for water to condense and freeze on the outside of a Schlenk tube when evaporation is in progress. This can simply be wiped away and the tube warmed by hand to encourage evaporation of low-boiling solvents. Alternatively, the melting of the ice can be a good indicator of when solvent evaporation is complete.
Once all the solvent has evaporated, the product can be loosened from the sides of the Schlenk flask by scrapping the sides of the flask with a spatula under a positive flow of inert gas. If the product forms a fine powder as it is scraped off the sides of the Schlenk tube, it can be a good idea to reduce the flow of inert gas into the tube slightly. A high gas flow rate combined with a fine powder can result in the powder being blown out of the Schlenk tube, covering you and your workspace with the product you spent a lot of time and effort trying to make. If the product is very powdery, one way to prevent it going everywhere is to cut a spatula-sized slit in the top of an old rubber septum. The septum can then be placed in the top of the Schlenk flask and the spatula inserted through it to prevent powder escaping as you scrape product off the sides.
Once your product has been removed from the sides of the Schlenk tube, it can then be transferred to other containers in a glovebox (see part 3 for more details) or prepared for analysis (see below).
Precipitation and Recrystallization
Every solid has a specific saturation point in each solvent. This is the concentration at which no additional solid (solute) will dissolve in the solvent at a given temperature. Precipitation and recrystallization both rely on creating a situation where the solute can no longer dissolve in the solvent. This usually involves preparing a saturated solution then altering the conditions, such as temperature and volume of the solvent, so that the solvent is unable to contain the material in it.
Precipitation of a solid product is possible through the partial removal of the solvent as described above. This reduces the volume of the solvent in which the product can dissolve and forces it to precipitate. Precipitation can be aided by cooling the flask, although, as discussed above, evaporation of the solvent under reduced pressure automatically cools the flask, so additional cooling is not often required.
Precipitation can also be achieved through addition of an excess of a second solvent, one in which the product is sparingly soluble. The product will have lower solubility in the resultant solvent mix and should precipitate out of solution. Three of the most common solvent combinations are:
- Addition of hexane to aromatic hydrocarbons
- Addition of hexane to dichloromethane
- Addition of diethyl ether to dichloromethane.
Recrystallization works on the same principle as precipitation, but the process is performed more slowly to give the molecules time to pack into a close, well-defined crystal. Techniques for growing air-sensitive crystals are described in Tips and Tricks for the Lab: Growing Crystals Part 3. Techniques for growing air-stable crystals can also be applied to good effect, however, modifications to the techniques are required to make them suitable for air-sensitive compounds. These techniques and modifications are described in Tips and Tricks for the Lab: Growing Crystals Part 2.
Filtration
Filtration can be used to isolate a solid product or to remove a solid by-product, leaving the desired product in solution. There are two ways of performing a filtration under an inert atmosphere: with a cannula or with a filter stick.
Filtration with a Cannula
This is based on the cannula transfer technique described in part 3. The difference is that a cannula with a filter is used to transfer the solution. This allows the solid to remain in the original flask while the solvent is transferred into a clean and dry Schlenk flask under inert gas.
The filter is made from a small tube of glass, approximately 2 cm long, with two open ends. The glass tube must be able to fit through the neck of the Schlenk flask in use, for example, a tube with an external diameter of 10–12 mm will fit nicely inside a B19 Quickfit joint. An internal diameter of 7.75 mm is recommended as this will fit a B13 septum perfectly and the entire filter will still fit through a B19 Quickfit joint. Attached to the glass tube is a piece of filter paper wrapped around the end (Fig. 16). The filter paper is secured to the tube with Teflon tape or a loop of wire. Folding the paper and securing it in place can be tricky at first, but becomes easier with practice.
Figure 16. Construction of a filter for a cannula.
The other end of the glass tube then has a rubber septum inserted into the it to allow the glass tube to be attached to the cannula (Fig. 17). The cannula must have a flat end for the filter to avoid puncturing the filter paper and negating its usefulness. The end of the cannula must be in contact with the filter paper for the filter to work. The same procedure for a normal cannula transfer is then used. See part 3.
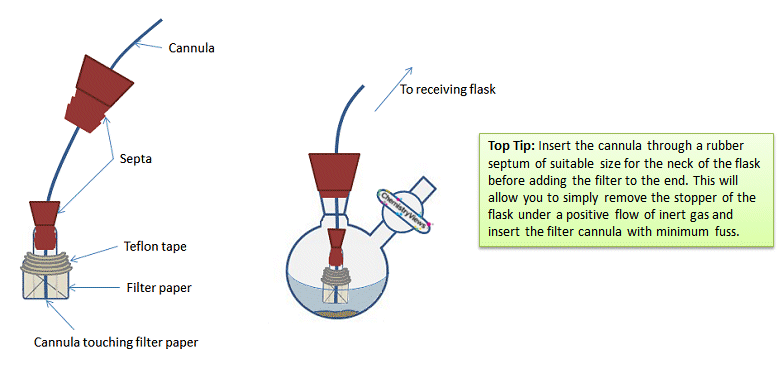
Figure 17. Correct positioning of the cannula and filter.
Washing
Whether your product is in the solution being transferred to the new flask, or is the solid that remains in the original flask, the remaining solid should be washed once all the solution has been transferred to the new flask. To do this, simply add more of the solvent (max. 5 % of the original volume) using the syringe techniques already described, give the flask a swirl then let the solid settle before transferring the solvent to the receiving flask via the cannula.
Filtration with a Filter Stick
A filter stick is a piece of glassware with two Quick-fit connector joints, a tap to attach it to a Schlenk line and control the internal atmosphere, and a section of sintered glass of medium porosity in the center (Fig. 18).
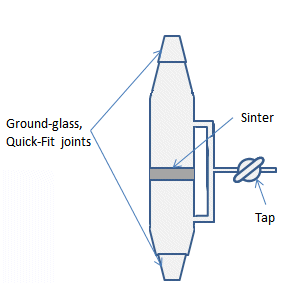
Figure 18. A sintered-glass filter stick.
To use a filter stick to collect a solution:
- Attach the clean, dry filter stick to a clean, dry Schlenk flask (Fig. 19, A).
- Attach the taps of both the filter stick and the flask to the Schlenk line and evacuate and backfill three times.
- Ensure there is sufficient inert gas flow into the filter stick, receiving flask, and the flask containing the reaction mix.
- Remove the stoppers and attach the filter stick to the top of the flask containing the solid to be filtered. You should now have the flask with the reaction mixture at the bottom, next the filter stick, and finally the receiving flask on the top. Make sure the taps of both flasks and the filter stick are on the same side (Fig. 19, B).
- Make sure there are no leaks and secure the joints with elastic bands or springs. Quick-fit clips can force the joins apart slightly, so are best avoided.
- Close the tap on the flask with the reaction mixture and remove the tubing connecting it to the line. This will make subsequent manipulations of the entire set-up easier.
- Pick up the flask with the reaction mixture and filter stick and gently swirl the solution to mobilize the solid as much as possible.
- Carefully tip the apparatus so that the solution enters the filter stick. Make sure that the side arms are “up” so that the solution is not poured into them (Fig. 19, C).
- Fully invert the apparatus and secure it.
- Allow the solid to settle out under gravity and the solution to filter through into the receiving flask (Fig. 4, D). Once the solid has settled, the speed at which the solution filters can be increased by reducing the pressure in the bottom, receiving flask: Close the tap on the filter and open the tap on the receiving flask to the vacuum briefly. Do not leave the tap open as this will increase the chance of the sinter becoming blocked with fine particulate matter.
A good way of ensuring only a slight reduction in pressure is to evacuate the connecting tubing, close the tap to the manifold, then open the flask to the static vacuum in the connecting tubing. - Once all the solution has filtered into the receiving flask, the solid can be washed with a small amount of fresh solvent. To do this, ensure there is a flow of inert gas through the filter stick and remove the top flask. The solvent can then be introduced through the open neck of the filter stick.
- Once the solid has been washed, the filter stick can be disconnected under a positive flow of inert gas from the receiving flask.
- Clean the filter stick immediately to prevent the sinter becoming blocked.
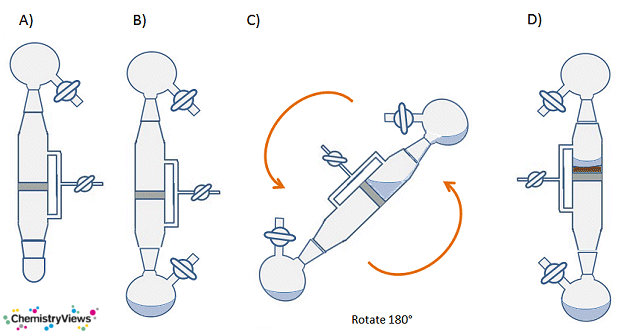
Figure 19. Procedure for using a sintered filter stick.
To use a filter stick to collect a solid:
Follow steps 1–11 above, then:
- Connect a clean, dry Schlenk flask under inert atmosphere to the top of the filter stick.
- Disconnect the filter stick from the receiving flask under a positive flow of inert gas.
- Stopper/cap the filter stick.
- Open the filter stick tap to vacuum to pump the solid dry.
- Once dry, open the filter and flask to the inert gas and invert the apparatus so that the solid falls into the flask. If the solid sticks to the filter stick, it is not dry enough and step 15 should be repeated.
- Disconnect the filter stick under a positive flow of inert gas from the Schlenk flask and stopper the flask.
- Clean the filter stick immediately to prevent the sinter becoming blocked.
Analysis
Having followed the isolation steps above, you should now have a solid ready to be analyzed. The most common analytical technique for air-sensitive compounds is NMR spectroscopy as it is fairly simple to prepare, submit, and run the sample under an inert atmosphere. Also, NMR spectroscopy is a non-destructive technique which is always a bonus when you have spent ages making and isolating your air-sensitive product.
If you are running a 1H NMR spectrum of your compound, you will need to replace the original solvent (with lots of hydrogen atoms) with a deuterated one so that the solvent peak does not swamp the product peaks. If you are studying nuclei other than 1H, such as 13C or 31P, then a deuterated solvent serves as a convenient way of locking the field and frequency of the spectrometer via the deuterium resonance peak.
The deuterated solvent must be dry and degased to ensure the integrity of the sample. CDCl3 is the most common choice of deuterated solvent and many labs that deal regularly with air-sensitive compounds will have a store of dry and degased CDCl3. However, some organometallic complexes can react with CDCl3 and lose Cl atoms. This is rare, but should be taken into consideration when choosing a solvent.
Once you have chosen your solvent, you need to select an NMR tube. These are available in a range of sizes and with different options for sealing the top in an air-tight manner.
The cheapest of these methods is to use a normal NMR tube and cap with a layer of parafilm or polytetrafluoroethylene (PTFE) tape to seal the join between the cap and tube against the air. This method is the least effective way of sealing an NMR tube and it can be tricky to assemble.
A slightly more effective and expensive method is to use a rubber septum to seal a normal NMR tube. Septa provide a better seal than a normal NMR tube cap, but are not suitable for highly air-sensitive compounds or for long-term storage as they degrade on prolonged contact with organic solvent vapors.
The most effective method, suitable for long-term storage and highly air-sensitive compounds, is to use an NMR tube with an integrated Young’s tap (Fig. 5, left). This is also the most expensive option.
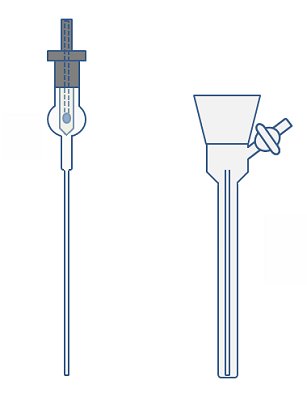
Figure 20. NMR tube with Young’s tap adaptor (left) and NMR preparation tube (right).
To prepare an NMR sample in a normal NMR tube, the NMR tube can be placed inside a larger, evacuable tube to enable the atmosphere to be removed and replaced with the inert atmosphere. It is impossible to get an NMR tube to remain upright in a standard Schlenk tube, so a specially made NMR preparation tube is required (Fig. 20, right). This evacuable tube should be narrow enough so that the NMR tube remains vertical when inside it. The top of the NMR tube should sit just below the tap of the preparation tube to ensure the sample constantly remains under a blanket of inert gas when the NMR preparation tube is open. A wide neck joint on the NMR preparation tube makes it easier to remove the NMR tube.
To Make an Air-Sensitive NMR Sample with a Normal NMR Tube
- Isolate your compound using one of the methods described above.
- Place the NMR tube inside the NMR preparation tube described above.
- Evacuate and backfill the NMR preparation tube containing the NMR tube, as described in part 2, three times.
- Ensure there is a flow of inert gas into the NMR preparation tube.
- Remove the stopper from the NMR preparation tube and replace it with a rubber septum. A bleed needle should be inserted through the septum to flush out the small volume of air in the septum.
- Using the techniques described in part 3, transfer 1 mL of dry, degassed, deuterated solvent into the Schlenk flask containing the compound to be analyzed.
- Dissolve a small amount (1–10 mg) of compound into the solvent.
- Transfer approximately 0.75 mL of the solution, via a syringe, into the NMR tube by inserting the syringe needle through the rubber septum and running the solution down the inside of the NMR tube.
- Remove the rubber septum from the NMR preparation tube and seal the NMR tube with either a rubber septum or with an NMR tube cap followed by wrapping the top and cap of NMR tube with parafilm, PTFE tap, or similar. If the top of the NMR tube is to low to reach easily, the NMR tube cap can be attached to the end of a pen or glass rod with a strip of parafilm or PTFE tape, alternatively, a piece of blue tack, plasticine, or another suitable sticky and moldable material can be used. This will enable you to put the cap on without taking the NMR tube out of the inert atmosphere.
To Make an Air-Sensitive NMR Sample with an NMR Tube with a Young’s Tap
The NMR tubes with the Young’s taps can be attached to the Schlenk line and subjected to the usual evacuation and refill cycles. Follow steps 7–9 above. Alternatively, the NMR preparation tube can be used in exactly the same way as above (steps 1–8. Instead of step 9, however, the Teflon top of the Young’s NMR tube is attached and used to remove the NMR tube from the preparation tube without exposing the sample to the atmosphere.
To Make an Air-Sensitive NMR Sample in a Glovebox
It is possible, and relatively simple, to make an NMR sample in a glovebox. However, some groups do not permit solvents to be taken into their gloveboxes as the vapors can damage the pump of the glovebox. If you are using a high-boiling solvent, this risk is somewhat reduced as long as the bottles remain sealed as much as possible. Of course, spilled solvent is always a risk and solvent splashed on the inside of the Perspex window can cause the Perspex to be damaged. Trying to wipe away any solvent splashed on the Perspex will result in the Perspex becoming smeared. Both smearing and solvent splashes on the Perspex reduce visibility into the glovebox, making it more difficult to use.
If you do not wish to take solvent into the glovebox, an NMR sample can be partially prepared in the glovebox. See part 3 for instruction on how to use a glovebox. Once in the glovebox, scrape some of the solid from the side of the Schlenk flask and carefully transfer it to the NMR tube using a spatula. Seal the NMR tube with a rubber septum. The solvent can be added outside the glovebox by following steps 8–9 above.
Summary
The isolation and analysis of your air-sensitive product requires careful manipulation of your compound. The simplest means of isolating an air-sensitive compound is to remove the solvent under reduced pressure – taking care to ensure all solvent removed is collected by the cold trap on the Schlenk line so that it doesn’t damage the pump. Removing the solvent can remove some impurities if they are liquids or sublime at low pressure, but most solid impurities will remain. Filtration or recrystallization can help remove these impurities and give you a clean sample for analysis.
NMR spectroscopy is the most commonly used analytical technique for air-sensitive compounds as it is non-destructive and there are a range of ways to make NMR samples under inert gas.
►Previous parts:
- Part 1 – The basics of Schlenk line design, some safety considerations, and how to start and stop a Schlenk line.
- Part 2 – The basis of all Schlenk line work, the evacuate-refill cycle, and how to dry and/or degas solvents.
- Part 3 – Some basic experimental set ups for performing reactions with air-sensitive compounds and how to add solids and liquids.
- See all Tips and Tricks for the Lab
Further reading:
- Advanced Practical Inorganic and Metalorganic Chemistry,
R. J. Errington,
Chapman & Hall, London, UK, 1997.
ISBN: 0-7514-0225-7
Do you have any tip or tricks for handling air-sensitive compounds? Share them in the comments section …
Article Information